Archive for the ‘RCheli’ Category

Place: Halle
Tanks flown: 2
Time flown: 0h34 (cumulative model timer: 23h19)
Rx battery recharged with: 824 mAh
Tx battery recharged with: 576 mAh (did 0h51 of sim as well; sim cumulative timer: 15h25+0h36)
Glow heater battery recharged with: 304 mAh
Starter battery recharged with: 55 mAh

Comment:
A windy but nice day at the field, although the sun was low and annoying.

Practiced small figure-8’s (20m total width) and hoovering in different orientations. I’m able to keep the heli steady for quite some time in nose in (i.e. around 1 minute).

Place: Halle
Tanks flown: 1
Time flown: 0h17 (cumulative model timer: 22h45)
Rx battery recharged with:
Tx battery recharged with:
Glow heater battery recharged with:
Starter battery recharged with:

Comment:
Another very windy day at the field. Practiced some stall-turns in windy conditions and nose-in hoovering.

Place: Halle
Tanks flown: 0.5 + 1.5
Time flown: 0h59 (cumulative model timer: 22h28)
Rx battery recharged with: 787 mAh
Tx battery recharged with: 475 mAh
Glow heater battery recharged with: 275 mAh
Starter battery recharged with: 55 mAh

Comment:
Mainly a short flight to check the new balance tape and correct the tracking: the “black” blade needed 1 turn more pitch (which roughly gave it +1° compared to the other blade). After that some basic flying around with stall turns. Did some adjustments on the throttle-curve to keep the rpm up when braking with some negative pitch.

Continue reading ‘Flight log 2008-07-26’ »

Place: Halle
Tanks flown: 3
Time flown: 0h51 (cumulative model timer: 21h29)
Rx battery recharged with: 173+1408 mAh
Tx battery recharged with: 672 mAh
Glow heater battery recharged with: 862 mAh
Starter battery recharged with: 62 mAh

Comment:
Another windy but beautiful day. Verified the tracking with the new balance tape: still good.

Had to replace the glow plug; it completely died after (or during) the first flight.

Tried some (successful) stall turns, mostly on my right side. I didn’t dare to do it as much at my left side due to some unpleasant memories.

At the end of flight 3, the RPM suddenly dropped and the rotor started “flapping” again: the (new) balance-tape wasn’t so good after all…

When recharging my Rx battery, my Graupner Ultramat 12 reported the battery “charged” after pumping in 173mAh. Giving it a second try did fill it up by a total of 1581mAh.

A few months ago, I got the FlyCamOne2 as an add-on for my Raptor. The manual mentions that the recording can be started and stopped electronically. With some additional electronics, it should be possible to start/stop the camera from the ground using one of the free channels on my remote.

The free channel can’t be used directly: the receiver sends out pulses of different lengths (between 1ms and 2ms), while the FlyCamOne2 needs a simple short to start recording. Some electronics will be needed to convert between these two.

After some googling, I found the CurveRC FCO2 I/F which does exactly that. But there are some downsides:

  • It consumes a lot of power (10mA on 5V)
  • Isn’t cheap (£10, plus international shipping, at the time of this post)
  • I don’t get to enjoy myself figuring out how to do this myself

The CurveRC print seems to be build around an Atmel Tiny25 microcontroller, which is an 8bit RISC processor with 2K of build-in flash. Using a microprocessor makes the design fairly simple since nearly everything can be done in software. However, it must be clocked at reasonable speed to do something useful. This explains the fairly high power consumption.

So I decided I could do “better”.

Continue reading ‘Convert PPM signal to digital’ »

As reported in my previous post, I needed to re-balance the rotor-blades. Again… Also, the glowplug needed a checkup.

The glowplug was easily fixed: some oil got between the alligator clip and the glow plug which caused some bad contact. After cleaning both the clip and the plug the glow heater was able to pump 4A through the circuit.

Rebalancing the blades was a bit more work…

Continue reading ‘Flight log 2008-06-09 – Follow up’ »

When it came to tuning my nitro engine, most guides referred to subjective measurements: “enough smoke”, “accelerates swiftly”, “sounds good”, … I, as a nitro-engine newbie, did not know what an engine should sound like and how much smoke it should produce.

I finally found some objective criteria to figure out whether the engine is too rich or lean: the temperature. This PDF by Tony Chaveiro reviews a CarbSmart needle controller, which uses the head-temperature as a feedback mechanism.

Apparently, 100°C is a nice head temperature to aim for. Leaning the mixture will increase the temperature, giving more fuel will cool it down.

I don’t know how I’ll use this knowledge to tune my engine, but at least I have an objective way judge the mixture.

I keep a logbook of every flight I make with my Raptor. Here is the entry for today. I’ll probably do some history-posts to get my complete logbook in the same database.

Place: Halle
Tanks flown: 2.5
Time flown: 1h20 (cumulative model timer: 20h38)
Rx battery recharged with: 1861 mAh
Tx battery recharged with: 773 mAh
Glow heater battery recharged with: 763 mAh
Starter battery recharged with: 1416 mAh

Comment:
A lot of wind at the field; it was difficult to keep him in a stable “hoover” (read: sideways flight into the wind).

Tried some figure-8’s with nose pointing in the right direction (i.e. forward). I learned the hard way that turning from downwind to upwind requires a lot more power than the other way around. That, combined with a pilot error, left we with my heli falling down much faster that anticipated. I don’t recall what happened next, but some scary moments later I found my heli coming to a stop at 1m altitude, fighting gravity at full power…

I convinced myself to fly another tank; to overcome the fear. Hoovering in front of me, I noticed some vibration in the rotor, along with a strange sound. I couldn’t see the tracking very clear, but it seemed to be fairly good. I landed and verified all links on the rotorhead; none of them felt loose. When trying to restart the engine, the glow-heater wasn’t able produce much current. I’ll have to check my glow extender and plug.

When I finally got the engine running again, the first few minutes where fairly normal flight. Next, the strange sound reappeared. Also, my RPM was somewhat lower than usual. The sound came and went, but it was definitely the rotor producing it. After landing the heli I found the source:
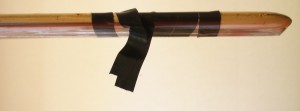
I guess I’ll have to re-balance the rotor again…

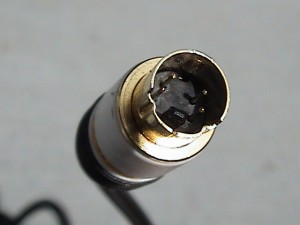
As a follow-up on my previous post on the Futaba FF9 trainer interface, I’m reporting the measurements of my E-Sky “0404” remote.

The E-Sky uses a much more popular 4-pin miniDIN connector:


Pin numbering is left-to-right, bottom-to-top: left-bottom is 1; right-bottom is 2; left-top is 3; right-top is 4; shield is all around.

Using the described pin-numbering, I measured the following signals:

  • pin 1 – shield: negative modulated PPM. Mostly high (1.7V), shorter pulses low (0V)
  • pin 2: high impedance/not connected
  • pin 3 – shield: 4V DC; probably used for remote power to the slave
  • pin 4: low impedance, no signal; probably PPM input when in master mode

When learning to fly a remote controlled model, getting a good teacher is worth a lot. But if all the teacher can do is watch the plane crash, he/she is of not much use…

Most transmitters have a “trainer” connection. This allows two remotes to be connected together. One is preforming the master-role and is actually controlling the model. The other remote is the slave and sends signals to the master. The teacher can program his master-transmitter to copy some of the slave’s signals, thereby letting the student control the plane. A simple toggle of the switch returns the control to the teacher.

Obviously, each brand of transmitters has its own “standard” of doing things. Some use a DIN6 contact, others use a mono- or stereo 3.5mm jack and there is the obligatory “proprietary connector”. Here are my notes of the expedition into the trainer-cable jungle.

Continue reading ‘Futaba FF9 Trainer interface’ »